Introduction
If you’ve ever organized an in-person election, you know the drill: printing ballots, booking a venue, counting votes by hand, dealing with lost proxies, and spending hours on logistics that could have been spent on actual governance work.
Online voting eliminates all of that. And with modern platforms like ElectionChamp, the entire setup process takes less time than ordering lunch.
Whether you’re running a board election for your HOA, a leadership vote for your nonprofit, or an officer election for your union, this guide walks you through every step. By the end, you’ll have a live election with secure voter keys, automated notifications, and real-time results — all without writing a single line of code.
Before You Begin: What You’ll Need
Before you log in and start building, gather these items so the process goes smoothly:
- A voter list. This can be a CSV or Excel file with voter names and email addresses (or phone numbers for SMS). For smaller elections, you can enter voters manually.
- Your ballot details. Know what positions or questions you’re voting on, who the candidates are, and what voting method you want to use (most elections use Plurality, where the most votes win).
- Your election timeline. When should voting open? When should it close? What time zone are your voters in?
- Your organization’s logo (optional). A PNG or JPG file that appears on the ballot, emails, and results page for a professional, branded experience.
Got all that? Let’s build your election.
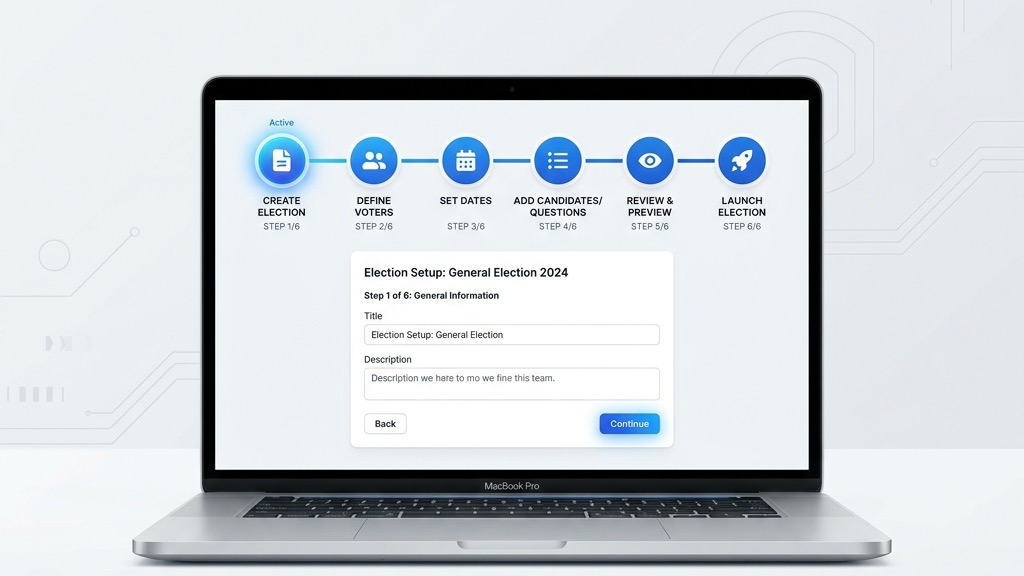
Step 1: Set Your Election Details
After creating your free account at app.electionchamp.com, click “Create New Election.” The first phase asks for the identity and timing of your election.
Election Name: Enter something clear and recognizable, like “2026 Board of Directors Election” or “Annual Budget Approval Vote.” This name appears on the ballot, in all email notifications, and on the results page. Your voters will see it, so make it descriptive.
Organization Name: Enter your organization’s name. This appears in the ballot header and notification emails, giving everything a professional, branded feel.
Logo: Upload your organization’s logo (PNG or JPG, max 1 MB). It appears at the top of the ballot, on the voter confirmation page, and in notification emails. If you skip this, no logo is displayed — the ballot still looks clean.
Voting Window: Set your Start Date/Time and End Date/Time. The election automatically opens and closes at these times. Voters can only cast ballots during this window.
Time Zone: This is the single most common source of confusion in online elections. If your organization is in California and you set the election to end at 5:00 PM PST, a member in New York will see it close at 8:00 PM EST. Double-check this setting.
Pro tip: Give voters at least 3–5 days to vote. Longer windows mean higher participation, especially if your members span multiple time zones.
Step 2: Configure Security and Notification Settings
This phase controls who can see what, when, and how voters receive their ballots.
Result Visibility
You have three options for controlling when results become visible:
- No One: Nobody (not even the admin) can see results until the election officially ends. This is the most secure option and prevents early results from influencing remaining voters.
- Administrator Only: Only you can see real-time results during the election. Useful when you need to monitor turnout without publicly revealing anything.
- After Election Ends: Both admin and voters can see results, but only after the election closes. Voters receive a secure link to view results.
Voter Notification Method
Choose how you want to notify your voters. You can combine multiple methods for the same election:
- Email Notification: The system automatically sends each voter an email with their unique voting link. This is the most common method — it’s fast, trackable, and supports resending.
- SMS Notification: The system sends a text message with the voting link. Great for reaching voters without email or for higher open rates.
- Manual Notification: The system generates unique 16-digit voting keys that you download and distribute yourself — by print, mail, or in person. Perfect for in-person meetings or voters without digital access.
Note: Your notification choice affects later steps. Email notification requires an email column in the voter list. SMS requires a phone column. Manual requires no contact info — you just distribute the keys yourself.
Optional: Ballot IDs and Voter Labels
Enable Ballot IDs if you need unique identifiers for cross-referencing without compromising anonymity. Enable Voter Labels to identify voters by name, membership ID, or department in the admin view — this makes managing large lists much easier.
Step 3: Build Your Ballot
This is the heart of your election. You can create multiple questions (ballot items) within a single election, and each question can use a different voting method.
For each ballot question:
- Choose a Voting Method. Plurality (most votes wins) is the default for most elections. Ranked Choice lets voters rank candidates in preference order. Nominations allow write-in suggestions. You can also use STV for proportional representation.
- Write the Position or Question Title. For example: “President,” “Board Member,” or “Budget Approval.” This appears as the heading for this ballot section.
- Add Voter Instructions. Explain context and rules: “Select up to 3 candidates for the Board of Directors. Terms are 2 years.” This text appears directly above the candidate list.
- Add Candidates or Options. Click “Add Candidate” for each option. You can add a photo and biography for each candidate. Voters can click “View Info” on their ballot to read these details before making their selection.
- Configure Advanced Settings. Set the number of winners (e.g., “Top 3”), choose “Up to” or “Exactly” selection mode, enable Random Order to eliminate position bias, and enable Allow Abstain for formal abstention tracking.
- Preview the Ballot. Click “Preview Ballot” to see exactly what voters will see. You can interact with the preview — select candidates, view the confirmation screen, and see the thank-you page. No data is saved during preview.
Pro tip: If you’re unsure how to structure your ballot, ElectionChamp offers an AI-Assisted Ballot feature. Enter a prompt describing your election and the system generates a ballot structure for you. You can edit it afterward.
Step 4: Import Your Voter List
This step defines who is eligible to vote.
Option A: Import via Spreadsheet. Upload a CSV or Excel file with voter data. Required columns depend on your notification settings — at minimum, each voter needs an identifier. If you enabled email notifications, include an Email column. If SMS is enabled, include a Phone column.
Option B: Enter Manually. For smaller elections, add voters one by one using the interactive grid. Click on a cell and type directly.
Always Add Extra Keys. Add 5–10 extra keys as blank, unassigned voter slots. These let you add latecomers without restarting the setup process. Extra keys count toward your total voter count for pricing, but they’re worth the small cost for flexibility.
Note: If you chose Manual Notification in Step 2, the system generates unique 16-digit voting keys that you can print, mail, or distribute in person. Each key is a one-time-use access pass to the ballot.
Step 5: Customize Your Notifications
Compose the emails and/or SMS messages your voters will receive.
The email editor supports Markdown formatting — you can use bold text, bullet lists, headers, and links to make your invitation clear and professional.
Template Tags
Use placeholder tags in your template, and they’ll be automatically replaced with real values when sent:
- #ballot-link# — The voter’s unique, one-time voting URL
- #election-name# — The election name you set in Step 1
- #organization-name# — Your organization’s name
- #election-deadline# — The voting deadline
- #access-key# — The voter’s unique 16-digit key
For SMS: Keep messages concise due to character limits. Use #mobile-ballot-link# for a shorter URL.
Step 6: Review and Launch
The final phase shows a complete overview of every setting you’ve configured.
- Review All Steps. The review page displays every section and whether it’s complete. Check every detail carefully — once launched, the ballot and voter list are locked.
- Complete Payment (if applicable). Elections with up to 20 voters are completely free. For 21–200 voters, it’s a flat $10. Above 200, it’s $10 plus $0.05 per additional voter. Payment is processed securely via Stripe.
- Submit and Launch. Click “Submit Election.” The system generates unique 16-digit keys for each voter, queues notification emails or SMS messages, and the election opens automatically at your scheduled start time. You’ll be redirected to your Election Dashboard.
What Happens After Launch
Once your election is live, your dashboard becomes your command center. You’ll see real-time stats including total voters, votes cast, pending votes, and a live countdown. A donut chart shows voter status breakdown (Pending, Voted, Cancelled, Error), and a participation trend line chart tracks cumulative votes over time.
From the dashboard, you can preview the ballot, manage the voter list, resend notifications to individual voters, close the election early if needed, and send results to all voters with one click after the election ends.
Your Election, Your Way
That’s it. Six steps, and your election is live. No venues to book, no ballots to print, no votes to count by hand. Your voters receive a secure link, vote from their phone or computer, and results are calculated automatically.
Whether you’re a first-time election administrator or a seasoned board member looking for a better process, ElectionChamp is designed to make secure, professional elections accessible to every organization.
Ready to run your first election? Start for free at ElectionChamp.com — no credit card required for up to 20 voters. All features included on every plan.